Learning how to use Seedream 5.0 Pro can help you move beyond basic AI image generation and create visuals that are easier to control, edit, and reuse. Instead of generating one attractive image and starting over whenever something looks wrong, you can work with text prompts, reference photos, spatial instructions, and targeted local edits inside a more practical creative workflow.
Seedream 5.0 Pro was officially introduced by ByteDance on July 8, 2026, with improvements in image-text alignment, structural coherence, text rendering, and multilingual generation. This tutorial explains the complete process on XMK, including how to generate an image from text, edit an uploaded image, work with multiple reference images, write better Seedream 5.0 Pro prompts, and refine results for marketing, ecommerce, and design projects.
Try Seedream 5.0 Pro on XMK and turn your prompt or reference images into a polished visual.
What Is Seedream 5.0 Pro?
Seedream 5.0 Pro is a multimodal AI image generation and editing model designed for complex visual production. It can interpret written instructions, analyze uploaded images, organize dense information, generate readable layouts, and apply changes to selected regions without unnecessarily rebuilding the entire composition.
This makes learning how to use Seedream 5.0 Pro especially valuable for creators who need more than a quick text-to-image result. The model is suited to workflows involving product photography, advertising concepts, ecommerce banners, presentation slides, educational infographics, multilingual marketing materials, and precise image-to-image editing.
Seedream 5.0 Pro can also respond to spatial annotations and sketch-based guidance, with an official feature set that includes point selection, lasso or box selection, material replacement, layer separation, and multi-image fusion — useful when you already have a visual direction but need to adjust exact elements or preserve important areas.
How to Use Seedream 5.0 Pro on XMK
The basic XMK workflow is straightforward: open the Seedream 5.0 Pro workspace, choose a generation mode, add a prompt or reference images, configure the image settings, generate the result, and review the output.
The current XMK interface provides Text to Image and Image to Image modes, support for up to 10 reference images, a prompt field, aspect-ratio controls, resolution settings, and output-format options.
Step 1: Open the Seedream 5.0 Pro Workspace
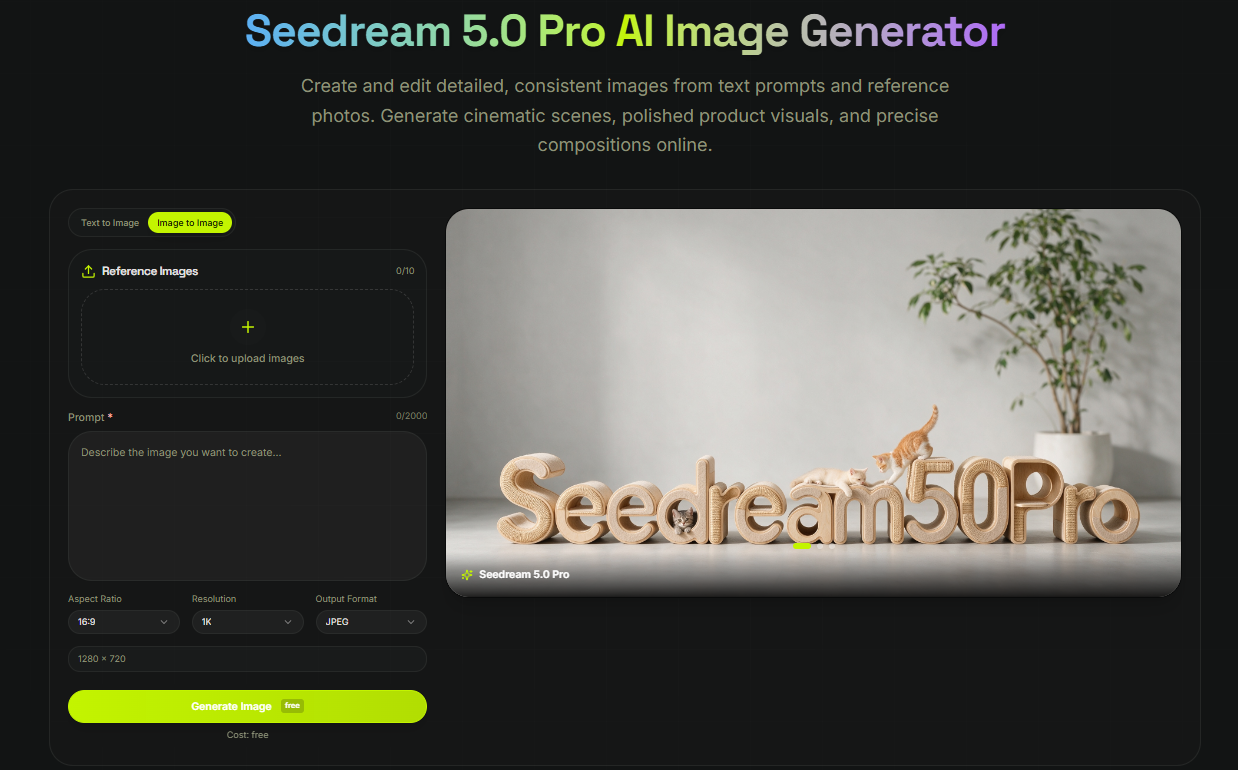
Start by visiting the Seedream 5.0 Pro image generator. The generation panel appears near the top of the page. Before entering a prompt, decide whether you want to create an entirely new visual or transform an existing image.
Use Text to Image when you want to generate a new scene from a written description, and Image to Image when you have a product photo, portrait, sketch, or layout that should guide the result. Choosing the correct mode first matters because Text to Image gives the model more creative freedom, while Image to Image provides more structural direction.
Step 2: Upload Reference Images When Needed
Reference images are optional for a text-to-image project, but they can significantly improve control and consistency.
On XMK, you can upload as many as 10 reference images. Depending on the project, each reference can provide a different kind of information — a character reference for facial appearance, a product reference for shape and packaging, a color reference for brand consistency, a composition reference for layout, a material reference for texture, or a lighting reference for atmosphere.
When using multiple Seedream 5.0 Pro reference images, explain the role of each image in the prompt. Do not assume the model will automatically know which reference controls the subject, color, layout, or style.
For example:
Use Image 1 as the product-shape reference, Image 2 as the color-palette reference, and Image 3 as the lighting reference. Keep the product design unchanged while placing it in a premium studio advertisement.
This method is clearer than simply uploading several images and asking the model to “combine them.”
Step 3: Write a Structured Prompt
A strong Seedream 5.0 Pro prompt should describe the creative goal in a logical order. You do not need to fill the prompt with random adjectives. The goal is to provide enough information for the model to understand the subject, composition, visual style, lighting, text, and restrictions.
A useful Seedream 5.0 Pro prompt formula is:
Subject + action or purpose + environment + composition + lighting + style + text requirements + details to preserve + details to avoid

For example:
Create a premium ecommerce hero image for a compact espresso machine. Place the machine in the center on a warm beige stone counter, with soft morning light entering from the left. Use a clean editorial composition with subtle coffee beans and a ceramic cup in the background. Add the headline “Better Coffee, Every Morning” in clear dark-brown text. Preserve the product’s original shape, buttons, logo placement, and metallic finish. Do not add extra accessories or alter the brand design.
This prompt explains both what should change and what must remain stable. Preservation phrases such as “keep unchanged” and “preserve the original shape” help reduce unwanted changes.
Step 4: Choose the Correct Aspect Ratio
Your aspect ratio should match the final publishing channel rather than being selected at random.
Common choices include:
Aspect ratio | Recommended use |
|---|---|
1:1 | Product thumbnails, profile posts, square social graphics |
4:5 | Instagram posts, promotional posters, mobile-first ads |
9:16 | Stories, Reels covers, vertical posters, mobile campaigns |
16:9 | Website banners, presentation slides, video concept frames |
3:2 | Photography, editorial images, landscape compositions |
2:3 | Portrait posters, book covers, vertical artwork |
Choose the ratio before generating the final version, since changing the canvas shape later may crop important objects. For text-heavy infographic prompts, wider or taller ratios usually leave more room for hierarchy, labels, and charts.
Step 5: Select the Resolution and Output Format
The ideal resolution depends on how the image will be used.
A smaller resolution may be suitable for quick experimentation, while a larger option is better for detailed posters, product visuals, presentations, and campaign assets. Before generating, check whether small text needs to stay readable, whether the design will be cropped into multiple formats, and whether transparency is required.
Choose PNG when you need sharp graphic elements, readable text, or transparent assets — this matters especially if you plan to use Seedream 5.0 Pro layer separation later. JPEG can work for ordinary photographic images where a smaller file size matters more.
Step 6: Generate and Inspect the Result
After configuring the prompt and image settings, generate the visual.
Do not evaluate only the overall attractiveness. Zoom in and inspect the details that matter most to the project — product shape, facial identity, hand structure, logo placement, spelling, and chart labels, along with shadows, reflections, and background continuity.
Knowing how to use Seedream 5.0 Pro also means knowing how to review its output — a result can look convincing at first glance while still hiding a misspelled headline or inconsistent reflection. Select the strongest generation as your base image instead of trying to repair a fundamentally weak composition.
Step 7: Refine the Image With Focused Instructions
Once you have a strong base image, make one focused change at a time.
For example:
Keep the composition, product, lighting, camera angle, and background unchanged. Replace only the red fabric beneath the product with dark green velvet.
A focused editing prompt is usually more reliable than a long revision request containing six unrelated changes. Work through a controlled sequence — correct the main composition, fix the subject or product, adjust colors and materials, refine text, then repair small visual errors — so it stays clear which instruction caused an unwanted result.
How to Write Better Seedream 5.0 Pro Prompts
The best Seedream 5.0 Pro prompts are specific without becoming disorganized, and each sentence should have a clear purpose.
Start with the final use case. Tell the model what the image is supposed to become — a skincare advertisement, a lecture infographic, a storyboard frame, a fashion campaign image, or a presentation cover slide. The intended use shapes composition, typography, information density, and visual polish.
Describe composition with spatial language. Phrases like “centered in the foreground,” “positioned in the upper-right corner,” or “arranged in a three-column grid” work well, since Seedream 5.0 Pro is designed to understand spatial positions and regional semantics — clear placement instructions give more control than vague design language.
Separate required text from visual instructions. When creating a poster, ad, slide, or infographic, put the exact copy inside quotation marks, for example:
Add the headline “Built for the Long Run” at the top and the subheading “Lightweight Performance for Every Trail” directly below it. Render both lines exactly as written.
Keep the amount of generated copy realistic. Even though Seedream 5.0 Pro improves text rendering, every generated word should still be reviewed before publication, since finer-grained text rendering and pixel-level editing consistency still have room for improvement.
Include negative constraints. Explain what the model should not change or generate — for example, “do not alter the person’s facial features,” “avoid distorted typography,” or “avoid duplicated products.” Negative instructions are especially useful in Seedream 5.0 Pro image-to-image editing.
How to Use Seedream 5.0 Pro for Image Editing and Precise Local Changes
Image editing begins with a strong source image and a precise description of the target change. Upload the image, switch to Image to Image, and identify four things in your prompt: what should be edited, where it is located, what should replace it, and what must remain unchanged.
For example:
Replace only the wooden tabletop in the lower half of the image with polished black marble. Preserve the coffee machine, cup, background wall, camera angle, reflections, and original lighting.
This prompt isolates the target region and protects the rest of the image. The phrase “edit only” or “replace only” establishes the boundary of the request, and listing protected elements adds another layer of control. Typical local changes include removing a small object, recoloring a product, repairing an incorrect label, or translating on-image text while preserving the original layout.
For more complicated edits, annotations, colored boxes, or rough sketches can indicate where new elements belong — the model’s official demonstrations include point-based editing, selected regions, and material replacement.
How to Use Multiple Reference Images
A multiple-reference workflow is useful when no single image contains everything you need — for example, uploading one image for the exact product, one for the environment, one for the color palette, and one for lighting direction.
Your prompt could say:
Create a 16:9 campaign image using the product from Image 1. Place it in an environment inspired by Image 2. Apply the muted blue and silver palette from Image 3, the side lighting from Image 4, and the centered composition from Image 5. Preserve the product’s dimensions, logo, controls, and surface materials.
The important principle is role assignment — each reference image should have a defined purpose. Avoid asking Seedream 5.0 Pro to copy every detail from every reference, since references may conflict with one another; establish a priority order instead.
How to Use Seedream 5.0 Pro Layer Separation
Layer separation helps turn a flat image into reusable design elements.
According to ByteDance, Seedream 5.0 Pro can separate a complete visual into independent layers such as text, subject, background, and decorative objects. It can also restore background areas that were previously hidden behind the main subject. A layer-separation prompt can be written like this:
Separate this poster into independent editable layers: background, headline text, secondary text, central product, shadow, decorative leaves, light effects, and foreground particles. Restore the hidden background behind the product and export visual elements with transparent backgrounds where appropriate.
This workflow is especially useful for rearranging poster layouts, replacing a central product, or building banner and multilingual campaign variations from one base design. Inspect every separated element before using it in a professional project — fine edges, shadows, hair, and transparent materials may need additional cleanup.
Want to test layer separation on your own poster or product shot?
Open the Seedream 5.0 Pro workspace on XMK and upload an image to try it.
How to Create Infographics With Seedream 5.0 Pro
High-density information visualization is one of the model’s central use cases. It can organize titles, sections, charts, diagrams, illustrations, and supporting labels inside a single structured composition.
For stronger results, prepare the information before prompting. Your infographic prompt should define the topic, audience, canvas ratio, main title, number of sections, required facts, chart types, and color palette.

Example:
Create a vertical 4:5 educational infographic titled “How Solar Panels Generate Electricity.” Design it for high-school students. Use six clearly numbered sections covering sunlight absorption, direct-current generation, inverter conversion, household distribution, grid connection, and energy storage. Include one simple flowchart, one labeled panel diagram, and small supporting icons. Use navy blue, warm yellow, white, and light gray. Keep all text concise, readable, and scientifically neutral.
Always verify facts, labels, units, and numerical data after generation. An attractive information graphic should not be treated as automatically accurate.
How to Create Multilingual Visuals
Seedream 5.0 Pro supports direct prompting and image generation in more than ten widely used languages, including Chinese, English, French, German, Russian, Japanese, Korean, Spanish, and Arabic. It is also designed to adapt layouts to language-specific typographic conventions.
For multilingual design, specify the exact languages, the order they should appear in, reading direction, and which text is most important.
For example:
Create a vertical 4:5 public-safety poster with the same message in English, Chinese, Japanese, and Korean. Place the four language sections in equal horizontal bands. Use a white background, black pictograms, and yellow warning accents. Keep typography clear and avoid decorative fonts.
For Arabic or other right-to-left scripts, explicitly request right-to-left alignment and check the final output with a fluent speaker before publication.
Best Uses for Seedream 5.0 Pro
Ecommerce product images — hero banners and lifestyle scenes, preserving the real product shape, color, and logo.
Marketing and advertising — campaign concepts and promotional posters, checked for trademarks and spelling before publishing.
Presentations and educational content — covers, diagrams, and posters, with final long-form text added in design software.
Social media campaigns — a consistent visual system across posts and stories, using the same references and palette.
Storyboards and concept frames — cinematic shot references built from camera angle, lighting, and mood cues.
Common Seedream 5.0 Pro Mistakes
Giving every reference the same priority — assign a role to each image and state which one matters most.
Editing too many things at once — change one major element per prompt so errors stay easy to trace.
Using vague preservation instructions — name the exact elements that must stay unchanged instead of saying “keep it similar.”
Adding too much generated text — dense copy creates more room for spelling and layout errors.
Choosing the wrong aspect ratio — generate with the final publishing channel in mind from the start.
Publishing without reviewing details — check faces, hands, logos, numbers, and cultural details before publishing.
A Practical Seedream 5.0 Pro Workflow
For reliable production, follow this sequence:
Define the image’s purpose and final channel.
Collect and assign a role to only the reference images you actually need.
Write a structured first-generation prompt and choose the final aspect ratio and resolution.
Generate several directions and select the strongest composition.
Refine one area at a time, correcting text, materials, and small details.
Generate alternate sizes or separated assets if the project needs them.
Review the final output at full resolution before publishing.
Add final long-form typography manually when absolute accuracy is required.
This workflow is the most practical answer to how to use Seedream 5.0 Pro for professional content. The goal is not to create a perfect image with one magical prompt. The goal is to move from direction to generation, evaluation, controlled editing, and final quality review.
Frequently Asked Questions
How do I use Seedream 5.0 Pro on XMK?
Open the Seedream 5.0 Pro workspace, choose Text to Image or Image to Image, upload optional reference images, enter a detailed prompt, select the aspect ratio, resolution, and output format, and generate the image. Review the result and use focused prompts to refine specific elements.
Can I upload multiple reference images?
Yes. The current XMK interface supports up to 10 reference images. Explain what each image should control, such as the subject, product, pose, color palette, material, lighting, layout, or visual style.
What is the best Seedream 5.0 Pro prompt format?
Use a structured format covering the subject, purpose, environment, composition, lighting, visual style, required text, protected elements, and negative constraints.
Can Seedream 5.0 Pro edit an existing image?
Yes. Use Image to Image and describe the target object, its location, the required modification, and everything that must remain unchanged.
Can Seedream 5.0 Pro create readable text in multiple languages?
Yes. It is designed for stronger small-text rendering, high-density layouts, and multilingual typography across more than ten commonly used languages. Even so, spelling, numbers, labels, and translated copy should still be checked before publication.
What is Seedream 5.0 Pro layer separation?
Layer separation divides a complete image into independent assets such as the background, subject, text, and decorations. These assets can be moved, resized, replaced, or reused in another design workflow.
Is Seedream 5.0 Pro useful for product photography?
It can generate product-focused compositions, advertising scenes, ecommerce banners, material variations, and campaign concepts. Preserve the original product design explicitly and check the output against the real product before commercial use.
How can I improve character or product consistency across images?
Use clear reference images, assign each reference a role, repeat the important preservation instructions, and refine the strongest output instead of restarting from an unrelated composition.
Final Thoughts
Understanding how to use Seedream 5.0 Pro is less about finding one perfect prompt and more about building a controlled visual workflow — a clear objective, structured instructions, the right settings, and focused revisions. Treating generation as an iterative design process, rather than a single lucky prompt, is what makes the results consistent and ready for real creative projects.