Learning how to use MiniMax H3 starts with understanding that it is more than a basic text-to-video generator. MiniMax H3 works with text prompts, images, video clips, and audio references inside the same creative workflow, which makes it useful for cinematic scenes, character videos, product ads, social content, image animation, and multimodal storytelling. On XMK, the workflow is organized around three modes: Text to Video, Image to Video, and Reference.
This MiniMax H3 tutorial covers the complete process on XMK — selecting a generation mode, uploading reference assets, writing stronger prompts, choosing settings, reviewing the first result, and fixing weak generations. It also includes copy-ready MiniMax H3 prompt examples and the exact upload limits the generator enforces.
Try MiniMax H3 on XMK and create your first AI video
What Is MiniMax H3?
MiniMax H3 is a multimodal AI video generation model designed to read several types of creative input in a unified context: a written prompt, a first or last frame, reference images, reference video clips, audio references, camera instructions, motion descriptions, and sound direction.
That changes how you should approach it. Instead of describing every character, object, movement, style, and sound inside one extremely long prompt, reference assets carry part of the information directly. The prompt then focuses on what should happen and how the inputs work together.
MiniMax H3 Upload Limits and Settings on XMK
The MiniMax H3 generator enforces its own validation rules, which you can open from the information icon beside Upload Media. These are the values the page actually checks against.
Item | Limit on XMK |
|---|---|
Reference images | ≤ 9 files, each under 10MB |
Image formats | JPEG, PNG, WEBP, BMP, TIFF, GIF |
Reference videos | ≤ 3 files, each ≥ 2s and under 50MB |
Video formats | MP4, MOV |
Video pixel count | 409,600 (e.g. 640×640) to 927,408 (e.g. 834×1112) |
Reference audio | ≤ 3 files, each ≥ 2s and under 10MB |
Audio formats | MP3, WAV |
Reference duration | 2–15 seconds total across video and audio |
Total files | 12 maximum, across all types |
Resolution | 768p or 2K |
Duration | 4–15 seconds, slider default 5s |
Three of these catch people out.
The 12-file cap is a total. Nine images plus three clips fills the entire budget, leaving no room for audio. The MiniMax H3 generator’s own guidance is to prioritise material that affects visuals or rhythm.
The video pixel-count ceiling sits below 1080p. An upper bound of 927,408 pixels is roughly 834×1112, so footage straight off a phone or camera usually needs downscaling before it can be used as a reference.
Reference video and audio share a 2–15 second window, and each file has to run at least 2 seconds. Very short stingers get rejected.
What Can You Create With MiniMax H3?
Common use cases include cinematic video, character animation, image-to-video clips, product advertisements, ecommerce videos, short narrative scenes, social media content, concept trailers, motion-driven scenes, and game environment concepts.
The right mode depends on what you already have. Text only means Text to Video. A still that should open or close the clip means Image to Video. Identity, movement, style, or sound coming from several assets means Reference.
How to Use MiniMax H3 on XMK
The six steps below cover how to use MiniMax H3 from a blank workspace to a reviewed result.
Step 1: Open the MiniMax H3 Generator
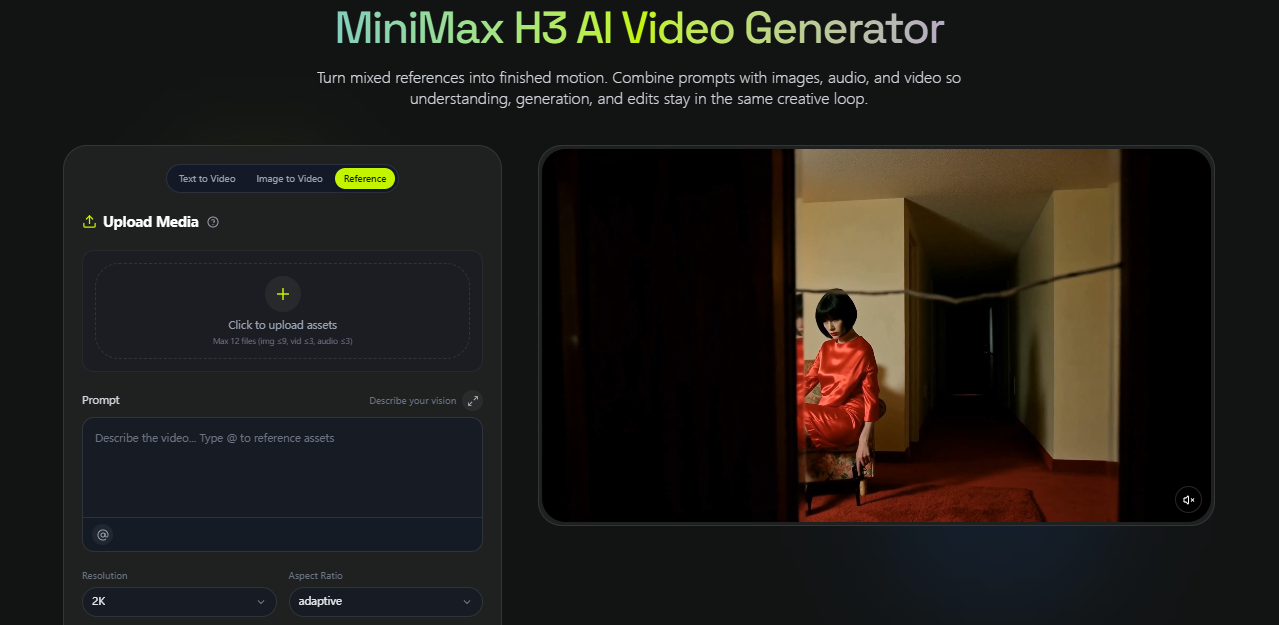
Go to the MiniMax H3 video generator on XMK.
The workspace sits directly on the feature page. Choose Text to Video, Image to Video, or Reference at the top of the panel. Mode matters more than it looks: each one exposes a different set of controls, and two of them hide the aspect ratio selector entirely.
Step 2: Choose the Right Generation Mode
Text to Video
Use MiniMax H3 Text to Video when no source image exists. The upload area disappears, leaving the prompt box and settings.
Aspect ratio is required here. The selector offers 21:9, 16:9, 4:3, 1:1, 3:4, and 9:16, defaulting to 16:9. There is no adaptive option, because there is no input asset to derive framing from.
This mode suits establishing shots, landscapes, concept visualization, abstract sequences, and rapid idea testing.
Image to Video
Use MiniMax H3 image to video when a still should define the opening or closing frame.
Two slots appear: First Frame, labelled required or last, and Last Frame, marked optional. You can supply either or both — supplying both turns the generation into a controlled transition between two fixed states.
There is no aspect ratio selector in this mode. Framing follows your uploaded image, so crop the source to your target ratio before uploading.
Reference Mode
MiniMax H3 Reference mode handles generations that draw on several assets, and it is the only mode that accepts video and audio.
The aspect ratio selector gains one option here: adaptive, which is the default and lets MiniMax H3 take framing from your references. This is the mode for MiniMax H3 reference video work — character identity, product geometry, motion transfer, and voice direction.
Step 3: Upload Your MiniMax H3 Reference Files
Add assets in MiniMax H3 Image to Video or Reference mode. Every reference should have a specific job:
Image 1: character face and hairstyle
Image 2: clothing
Image 3: product design
Video 1: walking motion
Audio 1: voice direction
Upload order matters, because you cite assets by name in the prompt. Put them in the order you plan to mention them.
Check the pixel-count range before uploading video. This is the limit most likely to reject an otherwise valid clip, and the fix is simply exporting a smaller version.
Step 4: Write a Clear MiniMax H3 Prompt
A useful MiniMax H3 prompt formula is:
Subject + Action + Environment + Camera + Lighting + Style + Audio + Constraints
For reference-based generations, add one more element: reference role — what each uploaded file controls.
Citing Assets With @
In Reference mode the prompt field shows a specific hint: type @ to reference assets. There is also an Insert Reference button below the field.
Use it deliberately. Rather than uploading five files and hoping MiniMax H3 infers your intent, cite each one where its contribution matters, give it a single attribute, and describe how the assets combine.
Prompt: Keep the product from Image 1 exactly as shown, including silhouette, cap shape, label placement, color, and material. Apply the camera movement from Video 1. Use Audio 1 only as the voice reference. Place the product on a dark reflective studio surface with high-contrast commercial lighting.
One asset, one job. This is consistently easier to control than a long prompt with unnamed uploads attached.
Step 5: Choose MiniMax H3 Resolution, Aspect Ratio, and Duration
Resolution. MiniMax H3 offers two options here: 768p and 2K, with 2K selected by default. Early on, composition and motion matter more than pixels, so 768p is a sensible setting while you iterate. Switch to 2K for product detail, textures, large-screen playback, cropped deliverables, and final commercial assets.
Aspect ratio. Where the selector appears, choose by destination — 16:9 for YouTube and websites, 9:16 for TikTok and Reels, 1:1 for square social placements, and 21:9, 4:3, or 3:4 for title sequences and portrait product frames. Generating in the target ratio beats cropping afterwards.
Duration. The MiniMax H3 duration slider spans 4 to 15 seconds and starts at 5. Short clips work best with one clear visual event. Longer clips benefit from a rough timeline:
0–5 seconds: Wide shot as the woman enters the café.
5–10 seconds: The camera follows her toward the counter.
10–15 seconds: She turns toward the camera while the shot slowly pushes in.
Longer generations also leave more room for identity drift, so shots demanding strict character or product consistency usually hold together better at 5 to 8 seconds.
Step 6: Generate and Review Your First MiniMax H3 Video
Press Generate Video, then review four things in the MiniMax H3 output separately, with sound on:
Subject consistency — did the character or product stay recognizable?
Motion quality — did the action complete naturally?
Camera behavior — did the requested move happen?
Audio — is there an audio track, and does it match what happens on screen?
That fourth check is worth doing explicitly. Confirm what your render actually contains before you plan a separate audio stage, because it determines whether sound is something you direct in the prompt or something you add in post.
Open MiniMax H3 on XMK and test the workflow with your own prompt
How to Write Better MiniMax H3 Prompts
The best MiniMax H3 prompts are not the longest. They are the ones that remove ambiguity.
Define the Main Subject for MiniMax H3
Weak: A woman outside.
Better: A young woman wearing a dark wool coat stands beside a rain-covered subway entrance in downtown Manhattan at night.
The second version supplies subject, clothing, location, weather, and time of day.
Describe Visible Motion
MiniMax H3 prompts need action verbs: walks, turns, reaches, looks up, runs, rotates, drifts, falls, opens, unfolds, accelerates, sways.
For image-to-video, avoid re-describing the static image. Explain what should move.
Add Camera Direction in MiniMax H3
Useful terms include slow push-in, dolly backward, tracking shot, handheld follow, low-angle shot, overhead shot, orbit around the subject, macro close-up, rack focus, static locked camera, and crane upward.
Prompt: A runner sprints through a narrow neon-lit alley during heavy rain. The camera tracks backward directly in front of him at chest height, keeping his face near the center of the frame. Water splashes from every step. Fast but stable cinematic camera movement.
Control Lighting and Atmosphere
Try soft morning light, golden-hour backlight, dramatic side lighting, diffused studio lighting, neon reflections, overcast daylight, warm practical lamps, or high-contrast cinematic lighting. Atmosphere can add rain, fog, snow, dust, smoke, reflections, wind, and moving fabric or hair.
Describe Sound in the MiniMax H3 Brief
MiniMax describes H3 as producing video with native stereo sound, though its current API guide documents audio primarily as a reference input. Either way, sound belongs in the brief: audio references can guide voice, timing, and edit rhythm, and describing the sound you want costs nothing.
A useful structure is voice + foreground sound + background ambience.
Prompt: A vintage motorcycle starts outside a roadside diner at dawn. The rider twists the throttle and pulls onto the empty highway. Low-angle tracking shot beside the rear wheel. Audio: engine ignition, deep motorcycle rumble, tires rolling over gravel, distant morning birds, no music.
“Quiet office, distant HVAC hum, no music” gives far more direction than “quiet office” alone.
MiniMax H3 Prompt Examples
Cinematic Character Prompt
Prompt: A cinematic medium shot of a detective standing under a flickering streetlight in a rain-soaked alley at midnight. He slowly raises his head and looks toward something outside the frame. The camera performs a subtle clockwise orbit. His coat moves slightly in the wind. Cold blue ambient light contrasts with warm orange light from a nearby window. Audio: steady rainfall, distant traffic, low electrical buzzing from the streetlight.
Product Video Prompt
Prompt: Premium black wireless headphones rest on a dark reflective pedestal in a minimalist studio. The camera performs a slow 180-degree orbit while a narrow strip of light moves across the metallic surface, revealing texture and detail. Fine mist drifts through the background. Luxury commercial cinematography, high contrast, precise product geometry. Audio: subtle electronic pulse and a soft mechanical transition sound.
Vertical Social Video Prompt
Prompt: Vertical 9:16 fashion video of a model walking confidently through a modern concrete corridor. The camera tracks backward smoothly at waist height. Her coat moves naturally with each step. Bright directional daylight creates geometric shadows across the walls. Clean editorial fashion style, energetic pacing, subtle footsteps and room ambience.
How to Prepare References for MiniMax H3
Because the MiniMax H3 generator validates on upload, a little preparation prevents most rejections.
Downscale reference video into the accepted pixel range. Trim clips so each runs at least two seconds and the combined reference duration stays within fifteen. Convert HEIC photos from a phone into JPEG or PNG, since the accepted image formats are JPEG, PNG, WEBP, BMP, TIFF, and GIF. Keep images and audio under 10MB each, and video under 50MB.
Then check that your references agree with each other. For character work, choose images where facial features are clearly visible. For products, use images that accurately show shape, materials, logo placement, packaging, colors, and surface details. For style, keep lighting and art direction reasonably consistent — if one image shows warm studio lighting and another a cold outdoor scene, MiniMax H3 decides which direction wins, and you lose that decision.
Fewer, better assets beat a full MiniMax H3 quota. A character video might need only two face references, one clothing image, one motion clip, and one voice sample.
Common MiniMax H3 Mistakes and How to Fix Them
Uploading video straight from a camera. Reference video must fall inside the pixel-count range, which sits below 1080p. Downscale first.
Uploading clips shorter than two seconds. Every reference video and audio file has a two-second floor.
Uploading HEIC photos. Convert to JPEG or PNG before uploading.
Expecting an aspect ratio selector in Image to Video. There isn’t one. Crop the source image instead.
Writing vague prompts. “A cool cinematic video” gives nothing actionable. Define subject, action, environment, camera, light, and mood.
Chaining too many actions. Instead of “the character runs, jumps over a table, turns around, grabs a cup, speaks, and walks through a door,” try “the character walks quickly toward the table, reaches for the cup, and stops beside it.” One clear action sequence controls far better.
Losing the character between shots. Strengthen the reference instruction and remove conflicting descriptions: Preserve the face, hairstyle, age, clothing, and body proportions from Image 1 throughout the entire shot. Shortening the clip helps too.
Watching the product change shape. Focus on geometry: Keep the exact bottle silhouette, cap shape, label placement, material, color, and proportions from Image 1. Do not redesign the packaging.
Uploading references without naming them. An asset never cited in the prompt has its role left to interpretation.
Starting at maximum complexity. Confirm the basic shot works, then add references, camera detail, sound, and constraints gradually.
MiniMax H3 FAQ
How many reference files can MiniMax H3 accept?
Up to 9 images, 3 videos, and 3 audio files, capped at 12 files in total for one generation.
What file formats does MiniMax H3 accept on XMK?
Images as JPEG, PNG, WEBP, BMP, TIFF, or GIF; video as MP4 or MOV; audio as MP3 or WAV. HEIC photos need converting first.
Why was my MiniMax H3 reference video rejected?
Usually pixel count. Reference video must fall between 409,600 and 927,408 pixels — roughly 640×640 to 834×1112 — which is below 1080p. Each clip must also run at least two seconds and stay under 50MB.
Can MiniMax H3 use audio references?
Yes. Audio references are supported alongside image and video, up to 3 files in MP3 or WAV, each at least two seconds. Audio can guide voice characteristics, timing, rhythm, or other sound-related context. MiniMax also describes H3 as generating video with native stereo sound, though its API guide documents audio mainly as an input, so check what your first render contains before planning a separate audio stage.
What resolution does MiniMax H3 support on XMK?
The generator offers 768p and 2K, with 2K as the default. Running early tests at 768p is a practical way to iterate before committing to a final render.
Can I choose the aspect ratio in every mode?
No. Text to Video offers six fixed ratios — 21:9, 16:9, 4:3, 1:1, 3:4, and 9:16 — defaulting to 16:9. Reference mode adds adaptive, which takes framing from your references. Image to Video has no selector, because framing follows the uploaded frame.
Can MiniMax H3 turn an image into a video?
Yes. Image to Video provides a First Frame slot and an optional Last Frame slot, so you can animate from an opening image, work backward from a closing image, or generate a controlled transition between two frames.
How long can reference clips be?
Reference video and audio share a combined window of 2 to 15 seconds, and each individual file must be at least two seconds long.
Is MiniMax H3 good for product videos?
Yes. A product image locks the object design while the prompt controls camera, lighting, setting, timing, and sound. Explicit geometry-preservation instructions matter most here. For a broader capability comparison, see MiniMax H3 vs Seedance 2.0.
Final Tips for Using MiniMax H3
The short answer to how to use MiniMax H3 well: reduce ambiguity rather than adding words. Choose the mode that matches your source material, prepare assets to the upload rules before you start, and give the scene one understandable sequence of motion with clear camera direction.
Cite every reference and say what it controls. Then review the first result with sound on and fix the one part that failed, instead of rewriting everything.
Create a video with MiniMax H3 on XMK and test the workflow with your own prompt and references.